• Please Remember: Members are only permitted to share their own experiences. Members are not qualified to give medical advice. Additionally, everyone manages their health differently. Please be respectful of other people's opinions about their own diabetes management.
  • We seem to be having technical difficulties with new user accounts. If you are trying to register please check your Spam or Junk folder for your confirmation email. If you still haven't received a confirmation email, please reach out to our support inbox: support.forum@diabetes.org.uk

On the subject of sourdough bread.

Docb

Moderator
Relationship to Diabetes
Type 2
Made my first ever sourdough bread today. Been at it since Sunday on and off but now I have a jar of starter which seems to have worked on a very small test loaf.

Any of you bakers got any useful hints for my attempt at scaling up to a full sized loaf? Whats the best bet - dutch oven, or open shelf. For open shelf do I try and generate steam?
 
Baking tray with 2” boiled water in it on the shelf below was our steam tactic when my youngest’s fiancée had a sourdough phase.

To get the distinctive big holes I think the mix has to be almost unhandleably wet.

If your starter is anything like ours you’ll have plenty of possible practice with the removing / feeding ritual.
 
I use a Dutch oven/cloche when I bake sourdough.
The dough is loose but not “unhandleably wet”. Too wet and it does not hold - you end up with more of a thick pancake.

The no knead recipe I use is
200g starter
650g/ml water
Whisk together

Add 1kg strong flour
Mix thoroughly until you have a rough dough.

Add 20g salt and mix through.
Cover and leave to rest.

Leave for 2 hours
Lift, fold, turn the bowl 90 degrees and repeat 4 or five times
Cover

Repeat every 20 minutes for at least 3 times.

Leave for about 4 hours.
Shape into two tight balls and place in proving basket/bowl with space to expand,

Leave to prove overnight.

Next morning, preheat the oven and Dutch oven/cloche to gas mark 8/230 degrees C

Once the oven is at temperature, turn a loaf into the Dutch oven/cloche and cook with the lid on for 45 minutes.
Remove lid, turn down temperature to gas mark 6/180 degrees C.
Cook for a further 20 minutes until your chosen colour.

Take out of oven
Lift loaf and tap bottom. If it sounds hollow it is cooked.


Place on a wire rack to cool.
Sourdough is best eaten next day.

I feed my starter every 3 to 4 weeks and store it in the fridge.
But I do like the sour flavour. If you don’t want it so strong, feed more often.
I feed with 100g flour and 100g water.
 
@helli - looks a neat and practical routine encompassing the essence of the umpteen recipes you find if you start looking.

Seems to me that the real key is getting the right amount of water and learning how to handle what is a very sticky dough and that will come with a bit of practice.
 
@helli - looks a neat and practical routine encompassing the essence of the umpteen recipes you find if you start looking.

Seems to me that the real key is getting the right amount of water and learning how to handle what is a very sticky dough and that will come with a bit of practice.
It should not be a very sticky dough. It is not even sticky.
Over time, I have got used to knowing by feeling the right consistency so it is hard to describe. But, if it is very sticky, you need to add more flour.
It is not possible to define exactly how much flour because different flours behave differently. And, just like diabetes, it is affected by other things like heat - my last sourdough loaves didn't like the heat and collapsed when I transferred them from the proving baskets.
I guess the easiest way to explain is that the dough should not be clinging to your hands - there will be some but if you hands are encased in sticky goo, you need more flour.
Because the recipe I use adds the water to the starter before the flour, it is not possible to adjust the water. In this recipe, the flour is the variable.
The only adjustment I have made to the original recipe (from bakerybits) is to add the salt after combining the flour. The dough gets a very different feel to it when the salt is added. It becomes "smoother".


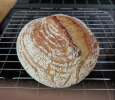
As I dug out a photo to show you one of my finished results, I realised I forgot one step:
Don't forget to slash the top of the loaf before putting it in the oven to allow it to expand.
1752217787365.png

A final (for now) two tips
- you don't need to place it anywhere warm to prove. All you need is somewhere out of a draft. I prove my bread in the microwave. This keeps it draft-free and out of the way of the work tops. I don't switch the microwave on.
- if your hands do get coated in dough, the best way to remove it is to take a small handful of flour and rub it on your hands over the bowl of proving dough. Almost like washing your hands in flour. The sticky dough will stick to the flour and can be added to the mix. I tend to leave it on the top of the proving dough - it will get combined as the dough expands.
 
Last edited:
On my way......
 
It is in the oven at the moment.

@helli - After the overnight proving, the dough seems to have loosened and has become very sticky when compared with the dough after the folding process. Is this normal, or do you suspect that I have simply not added enough flour in the first place?
 
giphy.gif
 
It is in the oven at the moment.

@helli - After the overnight proving, the dough seems to have loosened and has become very sticky when compared with the dough after the folding process. Is this normal, or do you suspect that I have simply not added enough flour in the first place?
This is what happened to my loaf a couple of weeks back.
I put it down to the heat. It may have over-proved if it is too hot.
I have seen some recipes that suggest proving in the fridge to ensure a slow prove. Sadly, my fridge is not large enough and I don't have enough beer in there to temporarily remove.

Or it could be that the proviing bowl/basket was not floured well enough. Ideally, even a slightly wet dough sholud just fall out when the bowl/basket is turned upside down.

Or it could be that the dough was too wet and needed more flour.

Usually, I get a good idea how it is going to end up when I form it into a tight ball. If the ball shape holds when I put it in the proving basket, it will be a solid loaf. If it immediately forms the shape of the basket, it will be a flatter loaf.
(It always forms the shape of the basket by the morning as it expands.)

I learned the way I form the ball makes a difference. It is a continuation of the stretching process but this time, grabbing a "corner" and stretching it over the ball. Turn and repeat until the ball is "strong".

Good luck.
 
Well here you go...suspense is nearly over ...

bread.jpg

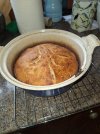
Cooked in the nearest thing I had to a dutch oven (a much used, lidded, cast iron, casserole pot). It is however reluctant to come out of the pot so have yet to do the tap on the bottom test. Leaving it to cool in the pot in the hope it might be easier to remove.

Thanks for the tips @helli, will work those into my next attempt. Might also either flour or oil the pot to try and stop it sticking.

I can also see why a floured cloth lined proving basket is used by the pros. I used a ceramic mixing bowl and I have no idea how you get flour to stick to that. I think I will improvise nest time with a floured tea towel in a colander.
 
Thanks for the tips @helli, will work those into my next attempt. Might also either flour or oil the pot to try and stop it sticking.
Semolina is great for "flouring" the cooking pot. The larger round grains, allows the dough to "glide".
It is what pizza makers use to transfer pizzas on a pizza peel.

Rice flour is supposed to be good for flouring the proving bowls but I decided there is a limit to the number of flours I should have in my kitchen so just use plain flour (it is cheaper than strong bread flour).

(Another tip from the Helli Baking School!)
 
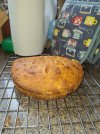
Well it' s out, all except the bottom crust which seems to be welded to the base of my pot.

Carefully angled picture....
20250714_114219.jpg

skillfully taken so you cannot see the rear which was dismantled in getting it out of the pot or the bottom crust which is still in the pot and soaking.

In terms of outcome, more cake shape than bread shape but beautifully crusty. I reckon it will make really good toast. Either that or a few weeks worth of croutons. Generally the only ways I eat bread.

Think I have got to look at the proving step, make the dough a little stiffer so that it forms a stable ball for baking. This dough did not. I might aim for a smaller loaf (this one was 500g) and try to get a ball that sits in the pot without touching the sides. Either that or look for an alternative dutch oven.

Might line the pot with baking paper to overcome the sticking issue. It will be a few loaves before I get to compete with your loaf above @helli.

PS...I keep some rice flour - my current method is to use rice porridge as the base for the fermentation marinade.

All jolly good fun!
 
Looks good @Docb
Lovely colouring.

Before I got my cloche (something like this), I used a large pyrex casserole dish upside down. Turning it over, allowed me to take the "dome" off to brown it. I can't say it was fool-proof though. Sometimes, it still wanted to take on the shape of the casserole dish.

If you can keep your starter going, it lasts forever. Mine is at least 9 years old and still going strong.
I have had to find alternatives when i really don't fancy any more bread. The most successful is sourdough crackers which are best rolled out with the pasta maker. They are made from sourdough starter plus enough flour to make a dough with a pinch of salt for flavour. Then baked for a few minutes. Good with cheese.
 
I used Elaine boddys methods for my sourdough. She has a website with free basic recipes, some thorough books, YouTube videos and a helpful Facebook group.

Trying sourdough in this heat is not for the faint of heart and definitely won't be helping with the stickiness!

I originally cooked in a cast iron pot, but upgraded (or downgraded depending how you look at it) to an enamel roasting dish similar to a falcon enamel roaster from the supermarket. Much lighter for lifting in and out of the oven, lots of space for generating steam etc and cheaper than cast iron.
 
Back
Top