More from the woodwork shop.

Chris Hobson

Well-Known Member
Relationship to Diabetes
Type 2
I thought that I would continue with the story of the wind organ project in a new post as the old thread was getting a bit long and was needing a lot of scrolling to get to the updates.

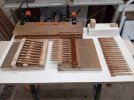
Picture 1. Jigs, no not lively Celtic dances but little frames to hold components together while glue sets. Top right is a little jig that I first made in order to attach the pads to the levers on the valves. I soon realised that doing the pieces one at a time would take forever. It also didn't hold the parts in position accurately enough. The sandwich style assembly with the four clamps, top left, is clamping the little leather pads onto the levers, one at each end so it is done in two stages. Rather than glueing fiddly little pieces on one at a time, I found it more efficient to glue the levers onto a strip of leather, bottom right, and then seperate and trim them with a modelling knife. The levers and pads are put together in two stages in batches of ten or eleven in the two jigs in the foreground.
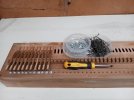
1000000058.jpgPicture 2. The first eleven valves installed. The pads are now in a nice straight line. If you look at the picture on the earlier thread you can see that the pads are uneven and this wasn't really satisfactory.1000000059.jpg
 
Last edited:
Wife Liz went to the gym early today so we were both up at 05:00 this morning. This allowed me to put in an epic day of organ fettling. So now all of the valves are fixed and re-installed and the valve assembly screwed to the keyboard. The keys have all been levelled up and a little spot of superglue put on each of the adjusting screws. Tomorrow I am hoping to attach my workshop vacuum cleaner to it as an experiment to make sure that all the keys make a sound.
 
Wife Liz went to the gym early today so we were both up at 05:00 this morning. This allowed me to put in an epic day of organ fettling. So now all of the valves are fixed and re-installed and the valve assembly screwed to the keyboard. The keys have all been levelled up and a little spot of superglue put on each of the adjusting screws. Tomorrow I am hoping to attach my workshop vacuum cleaner to it as an experiment to make sure that all the keys make a sound.
This must be such a rare skill. The local organ repair place sadly closed. So pleased to see that you are continuing this skill.
 
I'm not all that skilled, this job is well out of my comfort zone so I'm sort of winging it a bit. I have watched a lot of You Tube videos about renovating pianos. I have also been an engineer for my entire working life and I seem to have a talent for problem solving so that helps.

Edit.
I've had the vacuum cleaner crudely piped up to the keyboard assembly. Some of the keys are sticking slightly which is slightly disappointing as I went to quite a bit of trouble to make sure they were moving nice and freely. I thought that the springs felt quite soft so it's possible that they need tempering. Some of the reeds are failing to produce any sound so there is another job. The pressure in the wind chest is regulated by a kind of controlled air leak so I can't really do anymore on these problems until the pump assembly has been built, so that will be the next job.
 
Last edited:
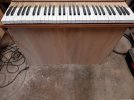
I have now built the wind chest and installed the pump. I've lined the box around the pump with sound deadening tiles and this has made the unit run nice and quietly. I tried heat treating one of the springs but it didn't make any difference. I'm considering installing an additional spring under each of the keys as the springs on some of the valves are barely strong enough to close the valve and lift the weight of the key as well. I identified the silent reeds and checked them, the problem had been caused by tiny chips of wood getting into them. Now all 61 keys are working I have been able to play some actual tunes on it. One or two of the reeds are out of tune so I've been watching You Tube videos about how to tune them.1000000064.jpg
 
I have now built the wind chest and installed the pump. I've lined the box around the pump with sound deadening tiles and this has made the unit run nice and quietly. I tried heat treating one of the springs but it didn't make any difference. I'm considering installing an additional spring under each of the keys as the springs on some of the valves are barely strong enough to close the valve and lift the weight of the key as well. I identified the silent reeds and checked them, the problem had been caused by tiny chips of wood getting into them. Now all 61 keys are working I have been able to play some actual tunes on it. One or two of the reeds are out of tune so I've been watching You Tube videos about how to tune them.View attachment 32289
I’ve learned many a trick from YouTube vlogs. Lol, our vacuum cleaner solved an issue a month back issue with an inline check return valve on a rear washer? Yours is looking good.
 
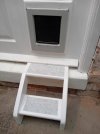
I'm getting sidetracked again, this time by my crappy back door. Our house was built in the mid 1950s, so slightly older than I am. I don't think that the back door is original but we have lived here for over 31 years, so it is at least that old. Over the years I have done numerous repairs, replacing hinges, handles and eventually the lock. Often the problem of knackered screw holes has been dealt with by using fatter and fatter screws. With the new handles the screws were often in a slightly different place, which alleviates that problem but eventually leaves the door looking like Swiss cheese. The plan was to replace the door frame, which I did. This was fairly straightforward, the worst part was getting the old frame off. There is always the problem that old houses are always slightly wonky so having to make some of the timbers tapered in order to create a precisely rectangular aperture for the door was a challenge. When it came to the door itself, the original plan was to cut out the damaged parts and replace them with new wood, but it soon became obvious that it couldn't be repaired. So, off to B&Q I went to get a new door. The original was an exterior door but the area outside the door is now closed in so an interior door was purchased. The door was just a tad too big so a tiny sliver had to be shaved off using the table saw. This is really a four arm job, but since I was by myself I just had to manage. Fitting the catflap was a bit of a challenge as the new door is hollow with a cardboard honeycomb inside, so wooden inserts had to be made to provide something to screw it to. Altogether I'm pleased with the result, just some painting and detail finishing needs doing now.

To add to the fun, half way through the job my table saw died. When I need to cut long pieces of wood to very precise thicknesses, this is a piece of kit that I really can't do without. It came supplied with a spare pair of carbon brushes for the motor which, amazingly I had managed to put away where I could still find them. With the new brushes installed the saw came back to life, much to my relief. Although back in working order, I feel that my table saw is well past its best, so a new one has been ordered from Amazon and has been promised for Friday. I do love getting new toys.
 
Back
Top